Thursday, December 30, 2010

Water watching: frozen edition

OK, I'm not a big fan of cold weather. I've lived most of my life in Wisconsin and show no signs of getting used to cold weather—in fact, quite the contrary.  Last week, however, I had an excellent winter experience and I was even outdoors when it happened. For a very brief time, the lake was frozen enough to be safe and there was not yet snow on it.
The ice was incredibly smooth and the clearest lake ice I've ever seen. We put on our ice skates and special skate covers that Mr. Rududu designed to keep our feet warm. (They really work.)
I loved the reflections but the most wondrous thing was down below us—something I'd never seen before. We were skating where the water is quite shallow, less than a yard/meter. The ice and water were so clear we could see the sand on the bottom. Anywhere there was an object on the lake bottom, such as a rock, there was a 3D "ghost" of bubbles in the same shape above it in the ice. Here are the bubbles over a cement block.
Here are the bubbles a sunken wooden object made up of boards.
 I have no idea why this happened, but it was lovely to look at. (If anyone has an idea, please let me know!) Now it's covered up by snow. I'm so glad I went out to see this.
  Update: I contacted the Center for Limnology at the University of Wisconsin (the people who study lakes) and they sent me the following explanation which I think is fascinating.
Even materials sunken in the water hold gases within the material--especially with something porous like a cinder block.  As the water cools, the object cools and contracts, and the gases are forced out through the material.  The first bubbles are caught under the top layer of ice, then as the ice freezes downward, the next bubbles are frozen underneath the first, etc., creating a layered effect.  Of course, the longer something is submerged, the less gas it holds, however, even the rocks that have been in the lake for years still have gas within them.  This year's freeze conditions resulted in some really clear ice, making the bubble/freeze effect even more defined.

Sunday, December 26, 2010

The world-wide panettone movement

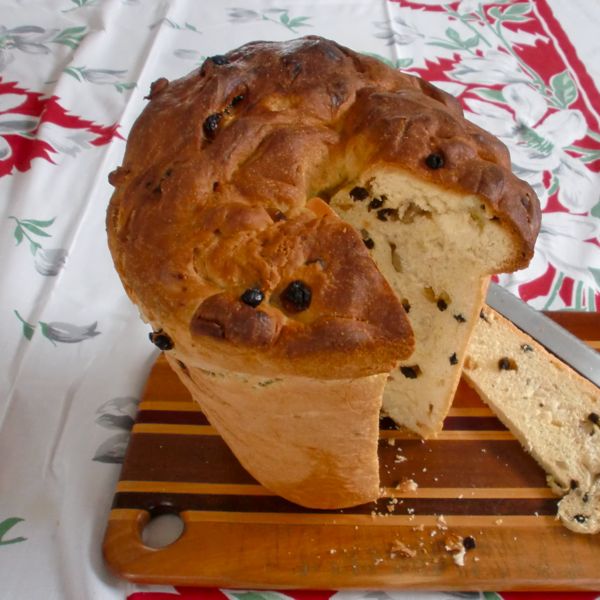
One of my holiday traditions is baking panettone, a type of Italian holiday bread eaten for both Christmas and New Year. It's a bread that is very popular in South America as well as Italy.
It's laden with butter and eggs in what is called an enriched dough. The ending "one" implies that this bread is big or special. You can buy panettone in fancy packages, but I'm suspicious of any bread that claims it can be eaten months after it is baked. Scary. Making homemade panettone is a bit of production because the dough must rest in the refrigerator overnight but it's well worth the effort. Like most bread, the hands-on time isn't long. (And if you have a heavy duty stand mixer, you hardly have to do any actual work.) If you make homemade panettone you don't have to eat mysterious red and green fruit pieces but whatever dried fruit you like. I pick two kinds from candied papaya, candied ginger, currants, raisins, dried cherries or cranberries. I've used walnuts, macadamias, pine nuts and pecans. I only use 2 kinds of fruit and some nuts, so the flavors don't get too confused.
   I make about 8 loaves a year and it's a gift that always seems to be appreciated. I've even given it to Italians and had them rave about it. I guess they were homesick. Of course, I have to do quality control every year to make sure I haven't lost my touch. Usually we do quality control on two loaves. Just to be sure.
Note on the mold. Panettone is traditionally made in a tall mold. Mine appeared unordered in a shipment of kitchen goods, as if to let me know that my destiny was to make panettone. I've been fulfilling that destiny for over 25 years. You can now buy one-time-use paper molds—or you can shape the dough into rolls. I've done that and it's delicious. Then I like to call them panettini.
  What's your favorite holiday baking project?

Panettone
2 T yeast
1/4 C warm water
1T sugar
Mix and let bubble. Add 1/3 C flour. Let rise until double.

2 1/2 C flour (bread or all-purpose)
1/2 tsp salt
1/4 C sugar
3 whole eggs
2 egg yolks
1 T + 1 tsp water
3/4 C softened butter (1 1/2 sticks)
1 tsp vanilla
grated lemon peel from one lemon or 1/4 tsp lemon extract or 1/4 tsp almond extract

Combine these ingredients with the ball of yeasted dough. Knead 10-15 min. Add more flour as needed, usually about 1 cup. (Your goal is to add a minimum amount of flour so the dough isn't dry.) Then add 1 cup total of dried fruit and chopped nuts. The best way to incorporate the fruit and nuts is to flatten the dough, spread on a layer of the fruit and nuts and then fold the dough several times. Let rise until double. (Enriched doughs often are very slow to rise. Be patient.) Punch down and refrigerate overnight, covered.
Punch down and place in buttered mold. Let rise until double. To speed up the action of this cold dough, I put the pan in a very warm place: on top of some potholders sitting on the radiator until it gets warm and starts rising. Bake 400 for 10 min. and 350 for 30-40 min.

Monday, December 20, 2010

Knitting toys

Not all my toys are things that I knit. Some are toys that are themselves knitting. This windup bear has been trying to progress on her scarf for quite some time.
This knitting fox is a carved toy from Russia. When the ball underneath moves around, the fox moves its paws to knit its sock.

Wednesday, December 15, 2010

Circledoodles!

I continued my experiments with doubleknitting with a scarf featuring circles and dots. I'm still fascinated by the reversibility of doubleknitting and the freedom it allows in designs.
Making circles is harder than making squares and rectangles like I did in my first doubleknit scarf. After doing a couple of circles following charts, I moved on to improvising as I went along as to the placement, size and shape of my circles. Some came out rounder than others, but I like to think this approach gave the scarf design a fresh feeling. It certainly made it more fun to knit. (Knowing exactly what I will be doing until the end of a project makes me feel a bit like a worker bee. Isn't it more exciting to not know exactly where you are going?)
I was bothered by some irregularities and especially an extra dot that made one of the circles look like the letter Q so I embroidered around many of the circles with a simple chain stitch. I concentrated on the more misshapen ones and did it until it stopped being fun; I decided not to embroider around every single circle.
I'm wondering: do you enjoy an air of uncertainty when knitting or do you prefer to know exactly what you are aiming at?

Saturday, December 11, 2010

A crowd of totoros

After seeing the brilliant Miyazki animation My Neighbor Totoro, I felt a need to make some forest spirits of my own. This holiday season I made some more to send to two very special little girls, along with a copy of the DVD. Before they go off on their big adventure, I took a group photo of them with our resident totoros.
Notes for how to make a totoro are on my Ravelry project page.
Meanwhile, Mr. Rududu has been busy making origami totoros. The model he used by designed by Robin Glynn. Here are some totoros who seem to be waiting for the cat bus.We believe the white one is about to become invisible.

Tuesday, December 7, 2010

Give away/holiday colors

To help me get in the holiday mood, I'm doing a modest give away. Details are at the end of this post. When it's cold and white outside, it makes me appreciate bright colors, even the classic red and green. This is my treasured Christmas stocking that my mom's cousin knit for me over a half century ago. My favorite gifts were the silly little things my mom put into this and the orange in the toe that tasted better than all other oranges.
Flowers in winter are so welcome.
My holiday decorating is quite simple; it takes about 10 minutes. One thing I do is put these temari ornaments out in a bowl. They're a traditional Japanese craft that I wish I knew how to do.
Give away details: Leave a comment by midnight December 15 and I will randomly select someone to get our limited edition handmade holiday card. Its photo features Mr. Rududu's origami in a small still life. It's a very secular image and I hope, quite cheering. I'm willing to mail it anywhere in the world. Please don't be shy! (And make sure you let me know how I can get in touch with you if you are selected.)

Thursday, December 2, 2010

Please don't call them cute

Listen, when you're an incredibly strong performing mouse, you don't want to be called cute. That's for sissy mice, mice in tutus maybe.  Yet almost everyone who sees Mr. Rududu's two latest additions to our Cirque de Souris, the Silnymys Brothers,  insists on cooing over them. Have some sensitivity for how these guys feel, please!
First we have the Strong Mouse. Look at those bulging thighs and biceps!
Next there is his brother, the Escapologist. He has to be strong to rip out of the rope tying his hands and to escape from his ball and chain.
Incidentally, although Mr. Rududu has taken over knitting mice for our circus, I still get to do the embroidery. I suggested that embroidering eyes to be covered up with a blindfold was a lot of work for something no one would see. But of course, I didn't know that the Escapologist was planning to peek!
As a technical note on eyes, moving them just a millimeter one way or the other can really change the whole personality of a mouse. So I preview them by inserting pins with round black heads on them and moving them around until the mouse looks just right. I know it's a little gruesome. So is Mr. Rududu's specialty: inserting the wire armature or "bones" in the mice after they are all assembled. It helps them stand up, but I just can't bear to watch it being done.
This circus of mice is designed by the brilliant Alan Dart. See our other mice on Ravelry.