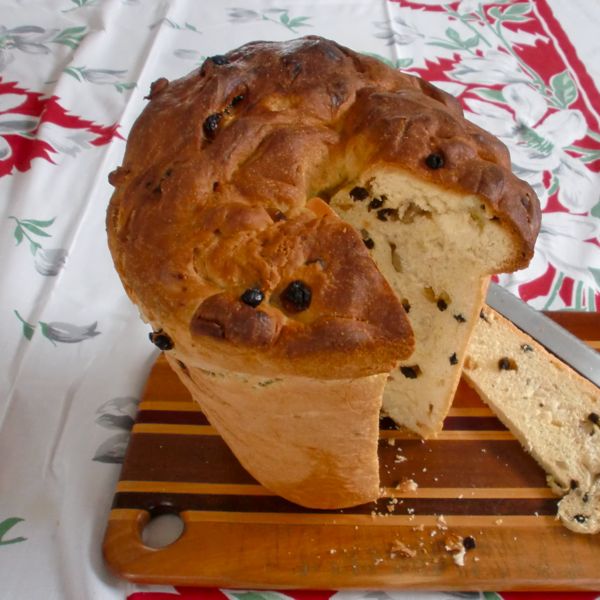
One of my holiday traditions is baking panettone, a type of Italian holiday bread eaten for both Christmas and New Year. It's a bread that is very popular in South America as well as Italy.
It's laden with butter and eggs in what is called an enriched dough. The ending "one" implies that this bread is big or special. You can buy panettone in fancy packages, but I'm suspicious of any bread that claims it can be eaten months after it is baked. Scary. Making homemade panettone is a bit of production because the dough must rest in the refrigerator overnight but it's well worth the effort. Like most bread, the hands-on time isn't long. (And if you have a heavy duty stand mixer, you hardly have to do any actual work.) If you make homemade panettone you don't have to eat mysterious red and green fruit pieces but whatever dried fruit you like. I pick two kinds from candied papaya, candied ginger, currants, raisins, dried cherries or cranberries. I've used walnuts, macadamias, pine nuts and pecans. I only use 2 kinds of fruit and some nuts, so the flavors don't get too confused.
I make about 8 loaves a year and it's a gift that always seems to be appreciated. I've even given it to Italians and had them rave about it. I guess they were homesick. Of course, I have to do quality control every year to make sure I haven't lost my touch. Usually we do quality control on two loaves. Just to be sure.
Note on the mold. Panettone is traditionally made in a tall mold. Mine appeared unordered in a shipment of kitchen goods, as if to let me know that my destiny was to make panettone. I've been fulfilling that destiny for over 25 years. You can now buy one-time-use paper molds—or you can shape the dough into rolls. I've done that and it's delicious. Then I like to call them panettini.
What's your favorite holiday baking project?
Panettone
2 T yeast
1/4 C warm water
1T sugar
Mix and let bubble. Add 1/3 C flour. Let rise until double.
2 1/2 C flour (bread or all-purpose)
1/2 tsp salt
1/4 C sugar
3 whole eggs
2 egg yolks
1 T + 1 tsp water
3/4 C softened butter (1 1/2 sticks)
1 tsp vanilla
grated lemon peel from one lemon or 1/4 tsp lemon extract or 1/4 tsp almond extract
Combine these ingredients with the ball of yeasted dough. Knead 10-15 min. Add more flour as needed, usually about 1 cup. (Your goal is to add a minimum amount of flour so the dough isn't dry.) Then add 1 cup total of dried fruit and chopped nuts. The best way to incorporate the fruit and nuts is to flatten the dough, spread on a layer of the fruit and nuts and then fold the dough several times. Let rise until double. (Enriched doughs often are very slow to rise. Be patient.) Punch down and refrigerate overnight, covered.
Punch down and place in buttered mold. Let rise until double. To speed up the action of this cold dough, I put the pan in a very warm place: on top of some potholders sitting on the radiator until it gets warm and starts rising. Bake 400 for 10 min. and 350 for 30-40 min.
Showing posts with label recipe. Show all posts
Sunday, December 26, 2010
Thursday, September 9, 2010
Easy pieces
Way back when, when I was working crazy hours, I realized that time after time I got home too tired and too hungry to even decide what to cook. That's when I made my list of "5 Easy Pieces": dishes that took very little time to put together, yet we like to eat. (One of them was frozen pizza. This might give an idea of how little brain power I had left when I got home since I actually had to have this written on a reminder list. I just don't think well when I'm hungry. Another easy and fast dish was tempeh in coconut milk. The exoticism of that was balanced by macaroni and cheese out of the box which is one of Mr. Rududu's favorite foods in the entire world. )
I don't know where that list is anymore. Happily, I'm no longer so pressed for time. But I often throw dinner together at the last minute on busy days. In the late summer with wonderful tomatoes available, a great option is Insalata Caprese.
Get a really ripe and flavorful tomato. Slice it up and lay it on a plate with slices of fresh mozzarella cheese. Sprinkle on some basil leaves, salt, and pepper. Dress with olive oil and vinegar. Savor.
I don't know where that list is anymore. Happily, I'm no longer so pressed for time. But I often throw dinner together at the last minute on busy days. In the late summer with wonderful tomatoes available, a great option is Insalata Caprese.
Get a really ripe and flavorful tomato. Slice it up and lay it on a plate with slices of fresh mozzarella cheese. Sprinkle on some basil leaves, salt, and pepper. Dress with olive oil and vinegar. Savor.
Saturday, August 7, 2010
Tomato heaven
This summer I planted 3 tomato plants in my flower garden. I'm not much of a gardener—I try to weed my garden of low maintenance flowers and plants twice a year whether it needs it or not. I have ignored my tomato plants in an almost criminal manner and should probably be turned over to the Society for the Prevention of Cruelty to Vegetables. Nevertheless, I have already harvested a lot of cherry tomatoes and my heritage variety just started producing huge tomatoes.
My favorite thing to do with home grown, flavorful tomatoes is make bruschetta. It's so simple you don't need a recipe and probably everyone already knows how to make it, but here's my super easy method. It doesn't involve turning on the oven, which is generally a bad idea since tomato season is by definition hot.
Get out one plate per person. Pour a spoonful of olive oil onto your plates. Toast a piece of substantial bread in the toaster. Rub one or both sides of the toast with a piece of raw garlic. Plunk the toast down on the olive oil. Chop of some really ripe tomatoes and some fresh basil leaves. Pile them on to the toasts. Drizzle with some more olive oil and salt to taste. Consider serving with some sweet corn and a hunk of good cheese.
My favorite thing to do with home grown, flavorful tomatoes is make bruschetta. It's so simple you don't need a recipe and probably everyone already knows how to make it, but here's my super easy method. It doesn't involve turning on the oven, which is generally a bad idea since tomato season is by definition hot.
Get out one plate per person. Pour a spoonful of olive oil onto your plates. Toast a piece of substantial bread in the toaster. Rub one or both sides of the toast with a piece of raw garlic. Plunk the toast down on the olive oil. Chop of some really ripe tomatoes and some fresh basil leaves. Pile them on to the toasts. Drizzle with some more olive oil and salt to taste. Consider serving with some sweet corn and a hunk of good cheese.
Sunday, May 2, 2010
Brownies: a recipe for making friends
I have turned quite a few of our tico friends into brownie fiends.
Once they have experienced brownies, they are shameless hint droppers along the lines of "Why don't you bring give me some brownies?" It makes me feel very appreciated. Ticos do very little baking and brownies aren't part of their tradition although they all seem willing to change that. I've given brownies as gifts to various workers, taxi drivers, or people who have done me a kindness and they are always very well received.
Baking chocolate in bars are not available here in Santa Elena. (I've seen it elsewhere in Costa Rica.) Luckily, cocoa is usually available. So I started with the recipe on the box of Hersey's Baking Chocolate and modified it so it uses cocoa and extra butter. And after a few years of tweaking and taste tests, I came up with my recipe.
Our friend Lucas recently asked me for my recipe and since I believe he has never baked anything in his life (although he cooks), I suggested he come over for a lesson. It was great fun making the brownies together. Here is Lucas mixing up the batter.
Russ always helps me by cutting the brownies.
My favorite way to eat a brownie is hot with a dab of ice cream, but eating one along the trail while birdwatching is good too. And some friends like to gobble them while still frozen. (Keeping them in the freezer prevents ants getting at them.)
Here is my recipe. Enjoy.
Carolina's brownies
Melt 2 sticks of butter. Turn off the fire and mix in 2 cups of sugar. Then add 3 eggs and 2 tsp. of vanilla.
In another bowl, mix 1 cup flour, 3/4 cup cocoa and 1/2 tsp. baking powder. Stir really well to get rid of any lumps in the cocoa and to make sure the baking powder is mixed in.
Add the butter mixture to the dry ingredients. If desired, add 1 cup chopped walnuts or macadamia nuts. You can also add 1/2-3/4 cups of unsweetened coconut along with the nuts.
Grease the pan with a lot of butter—2 tsp. or so. Bake at 350F (180C) until the edges of the brownies have pulled away from the pan and the middle looks shiny and has some resistance to your finger gently pressing on it. Don't overbake—these are fudgey brownies. Baking time depends on the size of the pan. I have a pan that is 9" X 12"(24cmX29.5cm) but today we used Lucas's pan that was 7.5" X 12" (19.5cm X 30cm) and it worked great. Baking time is between 25 and 35 minutes.
Hint: we put our pan of brownies in the freezer for a while before we cut them so they aren't as crumbly. After cutting we wrap them in twos in plastic wrap so they are ready for us to take along on a hike or to give to people.
Once they have experienced brownies, they are shameless hint droppers along the lines of "Why don't you bring give me some brownies?" It makes me feel very appreciated. Ticos do very little baking and brownies aren't part of their tradition although they all seem willing to change that. I've given brownies as gifts to various workers, taxi drivers, or people who have done me a kindness and they are always very well received.
Baking chocolate in bars are not available here in Santa Elena. (I've seen it elsewhere in Costa Rica.) Luckily, cocoa is usually available. So I started with the recipe on the box of Hersey's Baking Chocolate and modified it so it uses cocoa and extra butter. And after a few years of tweaking and taste tests, I came up with my recipe.
Our friend Lucas recently asked me for my recipe and since I believe he has never baked anything in his life (although he cooks), I suggested he come over for a lesson. It was great fun making the brownies together. Here is Lucas mixing up the batter.
Russ always helps me by cutting the brownies.
My favorite way to eat a brownie is hot with a dab of ice cream, but eating one along the trail while birdwatching is good too. And some friends like to gobble them while still frozen. (Keeping them in the freezer prevents ants getting at them.)
Here is my recipe. Enjoy.
Carolina's brownies
Melt 2 sticks of butter. Turn off the fire and mix in 2 cups of sugar. Then add 3 eggs and 2 tsp. of vanilla.
In another bowl, mix 1 cup flour, 3/4 cup cocoa and 1/2 tsp. baking powder. Stir really well to get rid of any lumps in the cocoa and to make sure the baking powder is mixed in.
Add the butter mixture to the dry ingredients. If desired, add 1 cup chopped walnuts or macadamia nuts. You can also add 1/2-3/4 cups of unsweetened coconut along with the nuts.
Grease the pan with a lot of butter—2 tsp. or so. Bake at 350F (180C) until the edges of the brownies have pulled away from the pan and the middle looks shiny and has some resistance to your finger gently pressing on it. Don't overbake—these are fudgey brownies. Baking time depends on the size of the pan. I have a pan that is 9" X 12"(24cmX29.5cm) but today we used Lucas's pan that was 7.5" X 12" (19.5cm X 30cm) and it worked great. Baking time is between 25 and 35 minutes.
Hint: we put our pan of brownies in the freezer for a while before we cut them so they aren't as crumbly. After cutting we wrap them in twos in plastic wrap so they are ready for us to take along on a hike or to give to people.
Subscribe to:
Posts (Atom)